REST API
Create a secure REST API integration with UE Auth or any other API
The instruction on this page will walk you through creating secure Client Credential integration between your service and the UE Auth API itself. These same steps within UE Auth can be used to create an integration into any of the other APIs. We will cover the following steps:
- Define a Product and API Service (oAuth Client) for your API
- Define a UE Auth Role with appropriate permissions
- Apply Role & Permissions to your API Service
- Generate a Client Secret JWT
- Request a Token
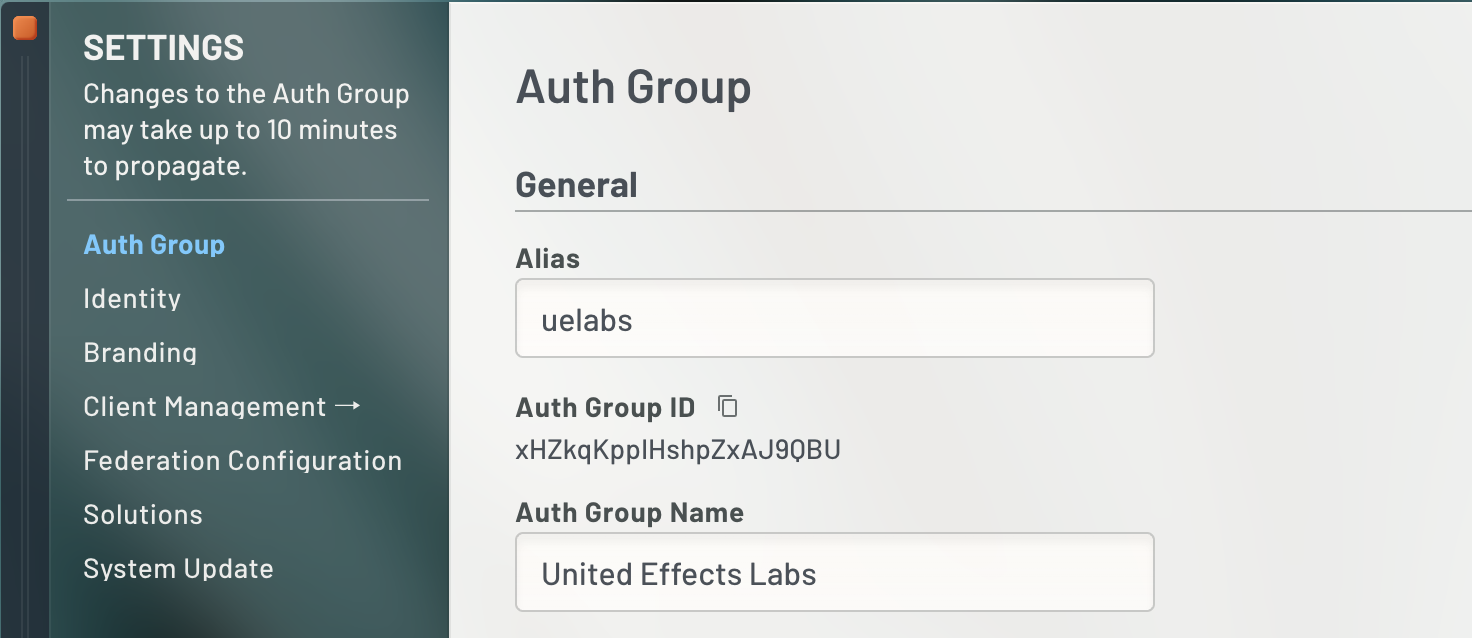
Before we begin, take a moment and grab your Auth Group ID. Click Settings at the top left of the portal. Make sure that "Auth Group" is selected in the window left nav and at the top of the screen you will see your "Auth Group ID" along with a copy icon. Copy this and save it for later.
1. Define Product and API Service
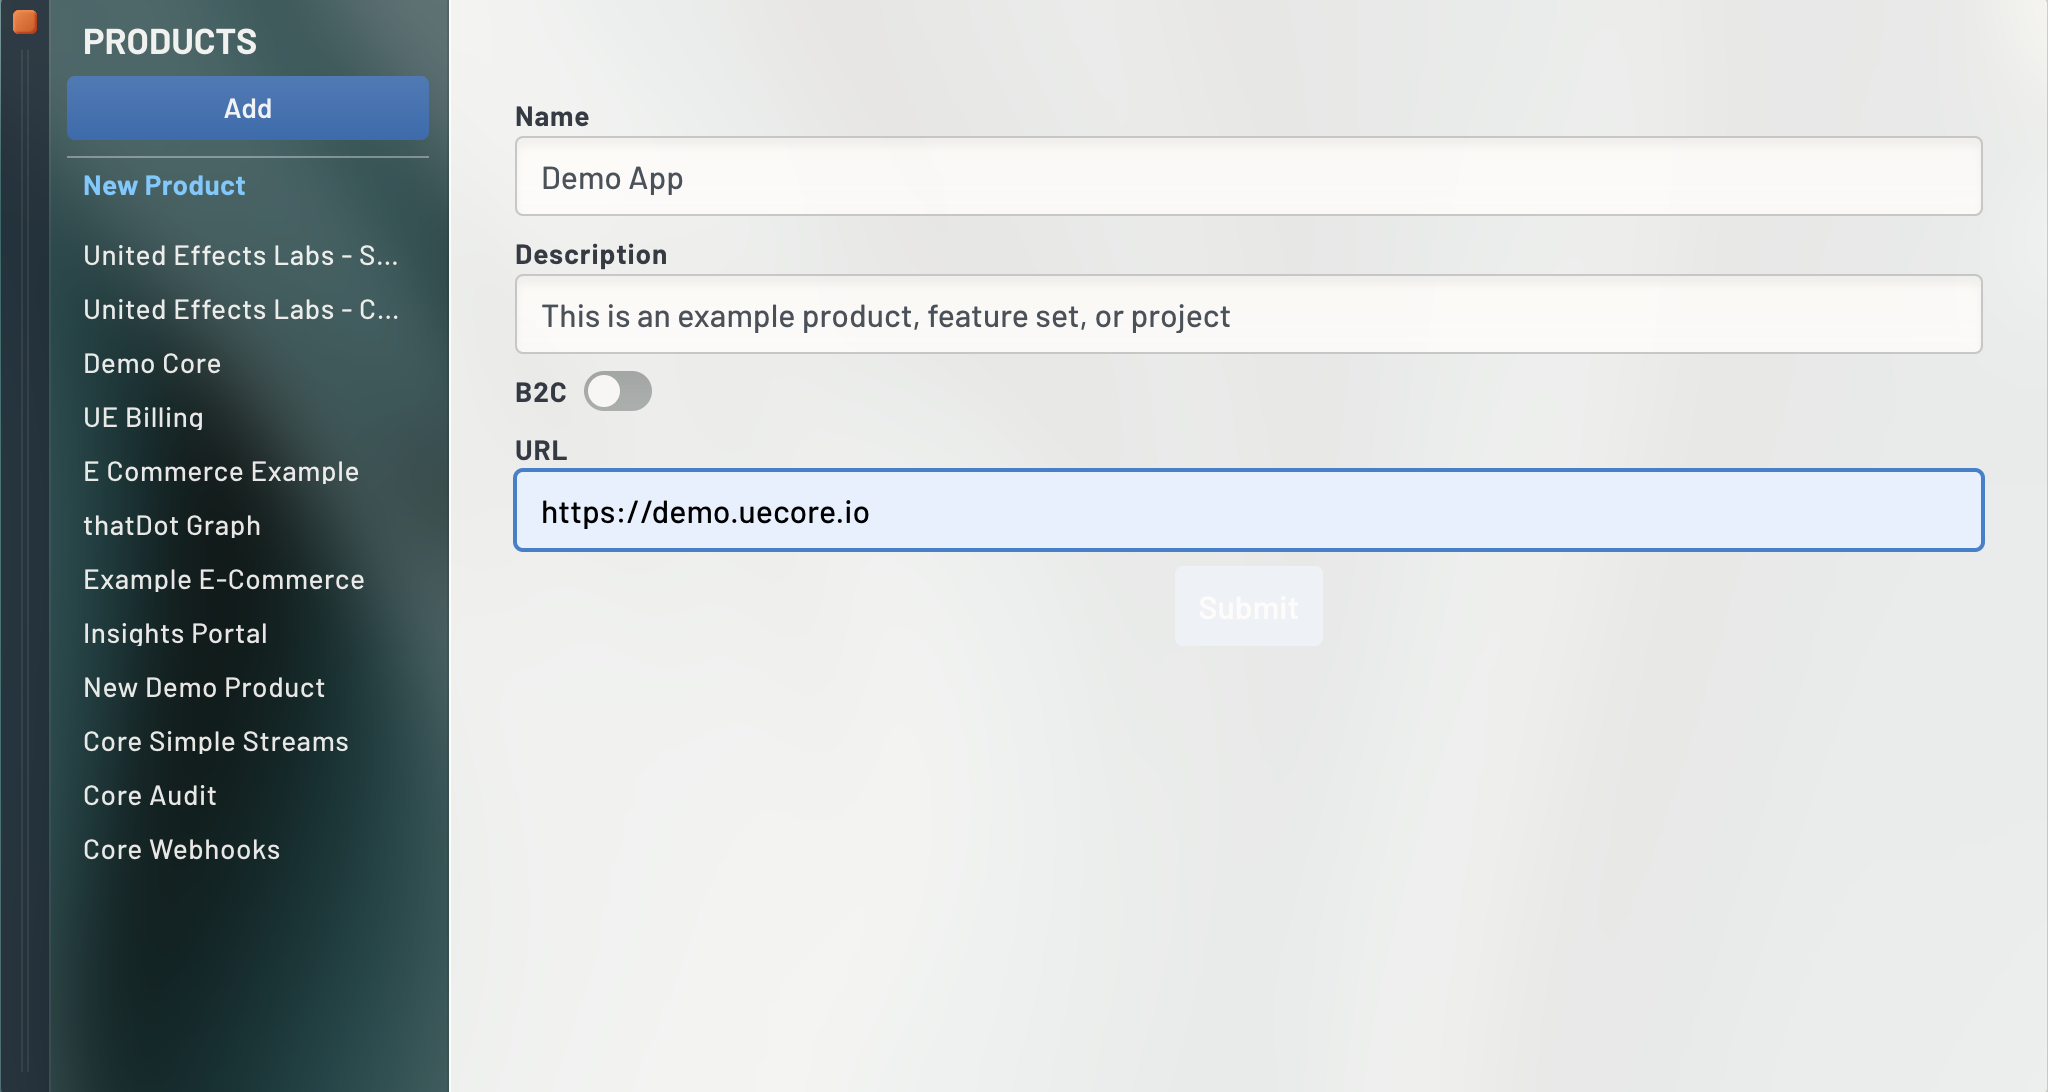
We recommend that you organize API integrations like this example through associated Products. For example, if you are building an integration to UE Auth to allow direct access to the API from a specific business product or project, you should create a Product representation with that name in UE Auth. You would need to do this anyway to create a login experience for that project. For our example, we will call the product "Demo App".
Log into the UE Auth portal and open Products using the right side navigation. Create a new Product by clicking "Add" and fill in the fields pertaining to your product.
Once added, highlight your Product and scroll down to the bottom of the details column. You'll see the label "Associated Services" and a button to Add one. Click it and select "Create new".
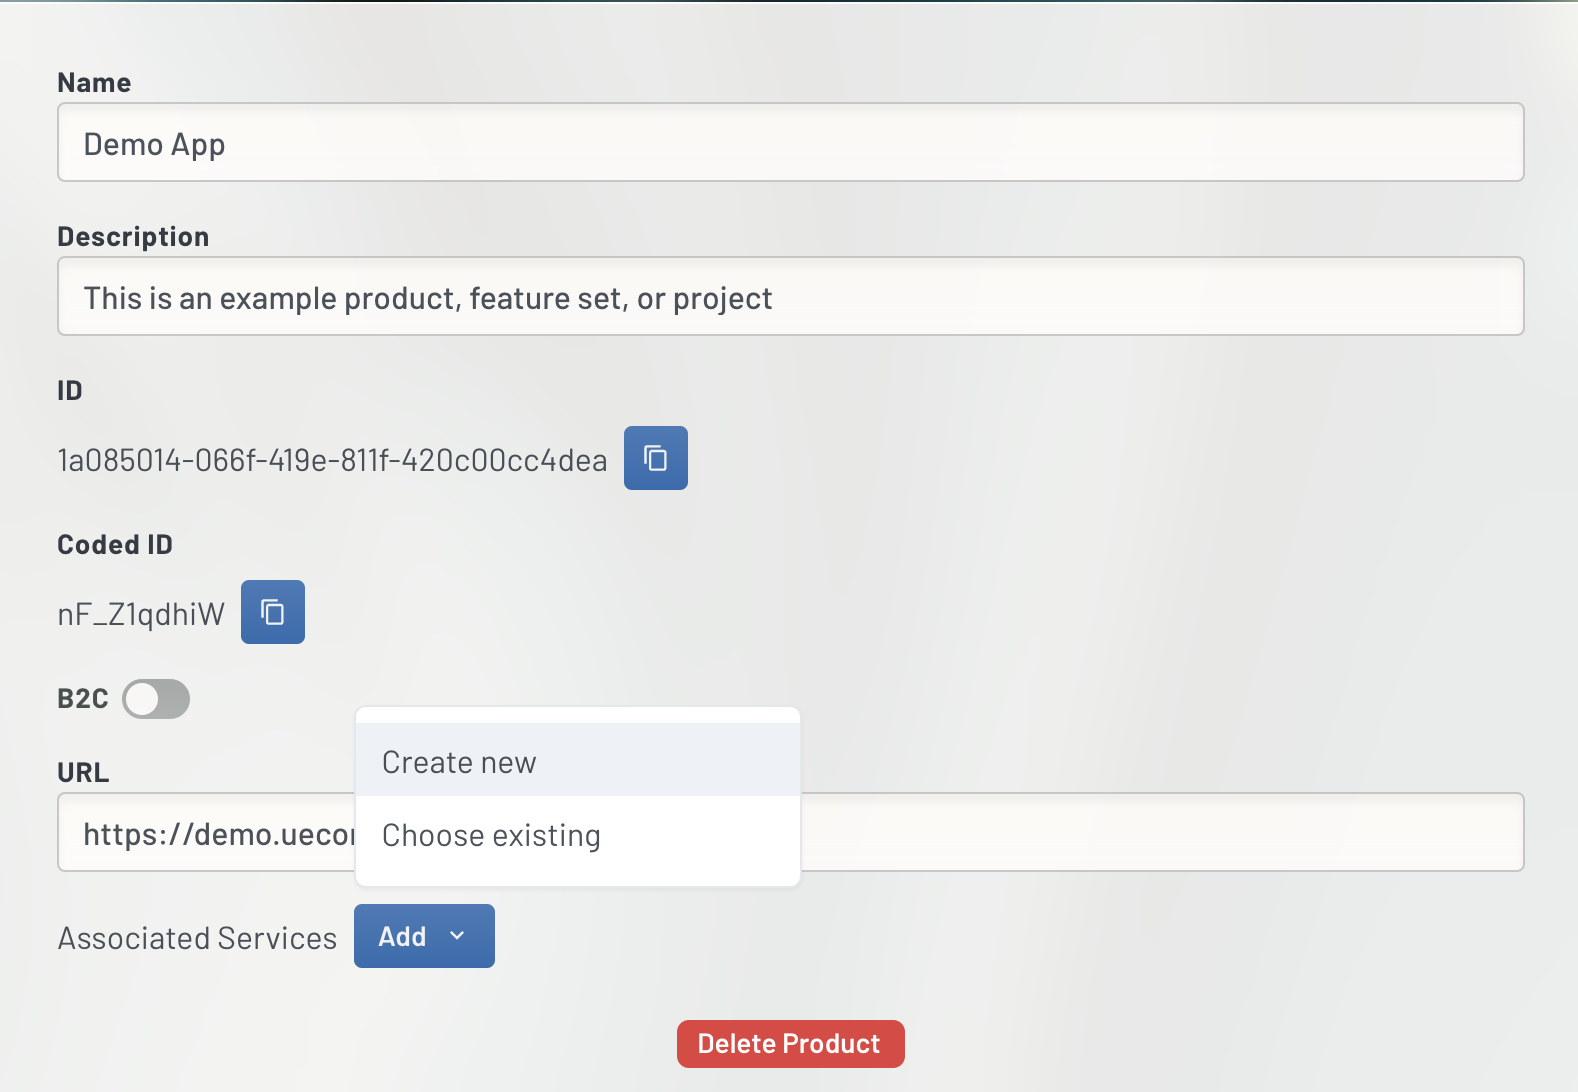
This will open the Service (a.k.a. oAuth Client) editor on the right. UE Auth lets you create many permutations of oAuth Clients here depending on your experience level and desired functionality. For this overview, we recommend the following settings as what we ourselves use for most Client Credential integrations at United Effects.
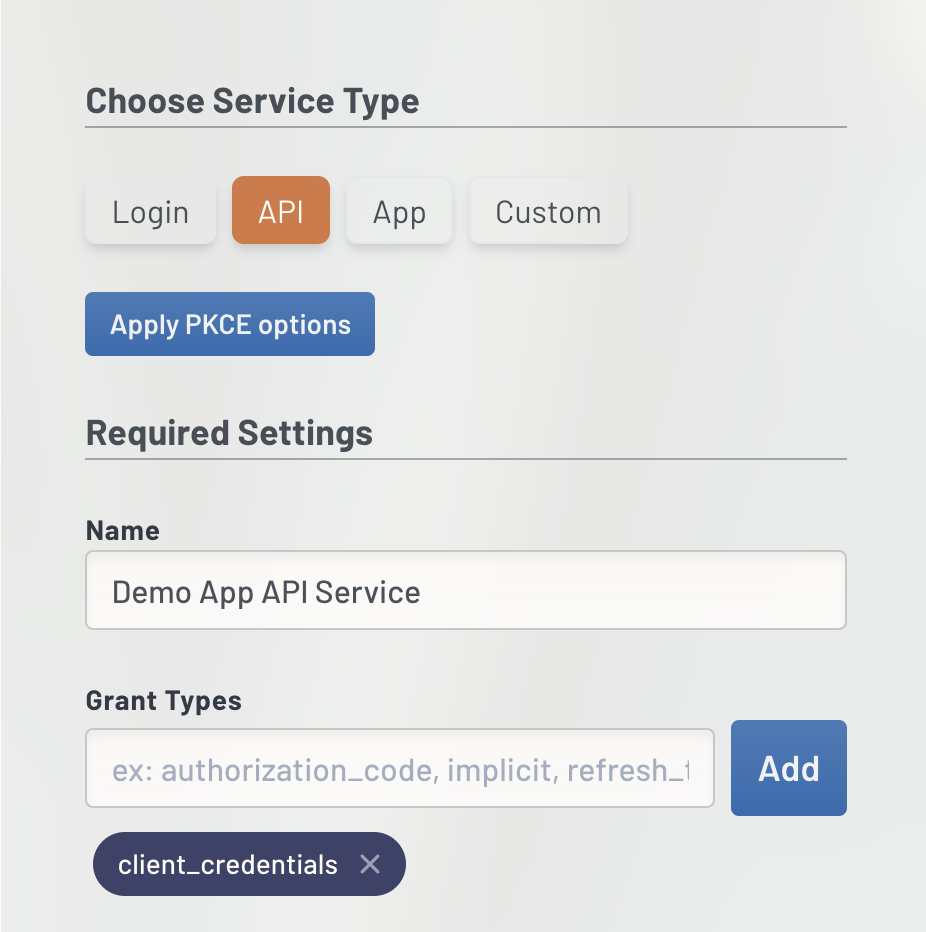
- Click "API" at the top of the column and then give it a name "Demo App API Service"
- Under Grant Types, type in "client_credentials" exactly as shown and click "Add"
- Scroll all the way down to Advanced Settings:
For Token Endpoint Auth Method select "client_secret_jwt"
For Introspection Endpoint Auth Method select "none"
For Revocation Endpoint Auth Method select "client_secret_jwt" - Click "Add Service"
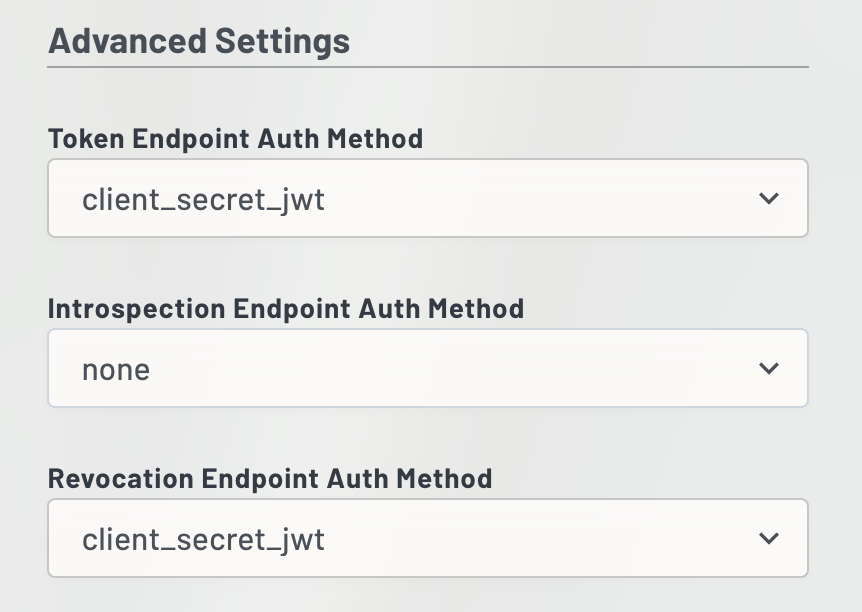
The "client_secret_jwt" selection allows your service to authenticate without sending the actual Client Secret across with the request and is generally safer than "client_secret_basic" authentication.
You've now created your client. Copy the Client ID and Client Secret using the copy icon and save those values for later.

2. Define UE Auth Role and Permissions
All United Effects solutions use UE Auth to manage access, include UE Auth itself. If you look at your Product list, you'll notice that there are already a few products listed. The very first Product will have the name of your Platform followed by Super Admin, in our case "United Effects Labs - Super Admin". This is the product representing UE Auth and the portal itself.
We are going to create a new Role associated to UE Auth that will allow any Service to which we map the Role to have specific permissions.
Click "Roles" on the left nav and select your UE Auth instance Product name. Then click the "Add" button to define a new Role. Define your new role as shown.
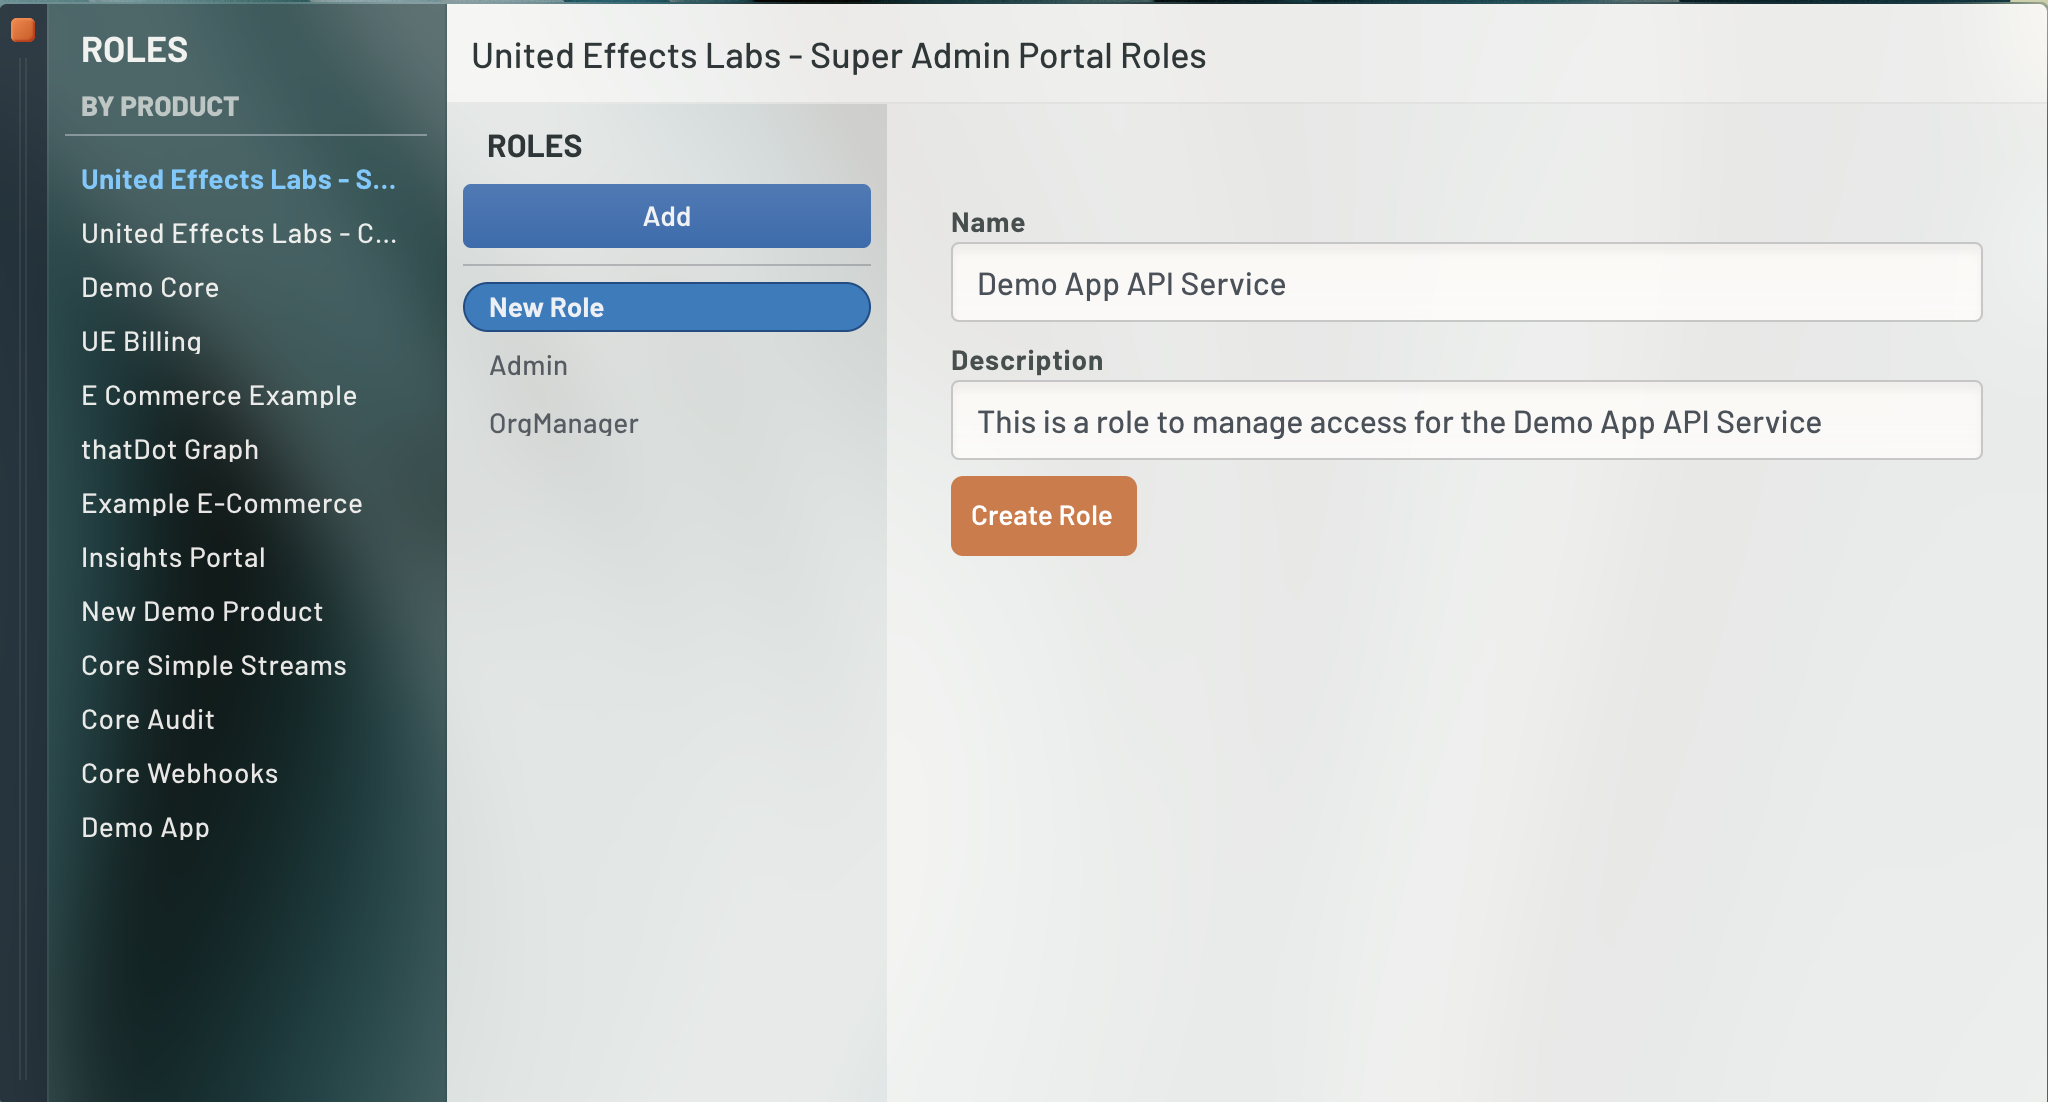
Once created, highlight the role and on the right panel, scroll to the permission assignment section. Here you will see every permission available for UE Auth. You can highlight those permissions that you'd like your integration to have and simply move them over. For our example, lets define Create, Update, Read, and Delete permissions across ANY Account.
Notice that some permissions specify an action against ANY target and some specificy actions against YOUR target. This distinction is primarily for users and enforces ownership over the resources. For example, Read ANY Account means you can view any account's information. Read YOUR Account means you can only view your own account's information and will receive a 403 Forbidden error if you attempt to request someone else's data.
DANGER
Be very careful here. You should give access to resources sparingly and only when absolutely necessary.
3. Apply Permissions to the API Service
THIS SECTION UI IS STILL UNDER CONSTRUCTION
You may perform this activity via API as well. Click Here for instructions.
We are now ready to associate the "United Effects Labs - Super Admin" Product and our new "Demo App API Service" Role to the "Demo App API Service" we created.
Currently, we only allow 1 Product's roles to be applied...
...to any given Service at a time. The result is that for each API Group or other product integration you wish to create, a new Service (oAuth Client) is required. We are open to feedback on this approach. Contact Us.
Go back to your Product window and highlight your Demo App product. Scroll to the bottom and under Associated Services, select your service.
On the right panel where the service config options are, scroll to the bottom and you will see a section for Client Access.
Here you will be able to select the product to which this service should have access, in this case UE Auth represented as "United Effects Labs - Super Admin". Once selected, you will see the available roles. Check the new Role we created for this service, "Demo App API Service"
DANGER
ONLY SELECT THE NEW ROLE. IT IS POSSIBLE TO GRANT YOUR SERVICE SUPER ADMIN PERMISSIONS HERE IF YOU ARE NOT CAREFUL.
Click "Update Client"
4. Generate a Client Secret JWT
We're almost there!
Before you can request a token, you must generate a Client Secret JWT. Remember that this step is specific to having specified "client_secret_jwt" during setup of the Service. If you selected "client_secret_basic" you can skip ahead to step 5 and simply use the Client Secret directly as basic auth. We do not recommend this approach for production integrations.
The below code snippet shows you how to generate your Client Secret JWT using a Node.js function. We will leave it to you to extrapolate this example to other tech stacks as needed.
In the example, you'll notice that the Client Secret JWT is set to expire in 1 minute by default but is configurable.
import jwt from 'jsonwebtoken';
import { v4 as uuid } from 'uuid';

const CLIENT_SECRET = 'YOUR_CLIENT_SECRET'; //from step 1
const CLIENT_ID = 'e024afbc-b212-4411-aa95-21b037f3af97'; // from step 1
const CLIENT_ASSERTION_TYPE = 'urn:ietf:params:oauth:client-assertion-type:jwt-bearer';
const AUTHGROUP = 'xHZkqKppIHshpZxAJ9QBU';

/**
* NOTE - if you are using a custom domain for UE Auth,
* you may specify it here instead of auth.unitedeffects.com
**/
const URL = `https://auth.unitedeffects.com/${AUTHGROUP}/token`

async function getSecretJwt(minutes = 1) {
	const claims = {
		iat: Math.floor(Date.now() / 1000),
		exp: Math.floor(Date.now() / 1000 + (minutes*60)),
		iss: CLIENT_ID,
		aud: URL,
		sub: CLIENT_ID,
		jti: uuid()
	};

	return jwt.sign(claims, CLIENT_SECRET);
}
5. Request Token & Integrate
We have now configured everything necessary to request a secure token with access only to the resources we need.
As before, the below Node.js code snippet shows how to request this token and assumes that you the reader will extrapolate the appropriate alternatives in other tech stacks.
The example does not including any caching or retry logic, which we suggest you implement in a production system to avoid failed calls when the token expires.
// Assume all imports and variables from previous snippet are here
import api from 'api'
const sdk = api('@unitedeffects/v1.0#ju6x2xldp56199');

/**
* Note that Audience ensures that the returned token will be a JWT and not opaque.
* This is important because we specified that our service would not have an
* an introspection auth method. You would need to adjust the Service if you
* want to use opaque tokens to account for this. In that case, audience would not
* be required.
*
* Audience should always be a URL. This is the URL to use when requesting access
* to UE Auth. Your custom domain for UE Auth could also be used in its place.
**/
const AUDIENCE = `https://auth.unitedeffects.com/${AUTHGROUP}`

async function requestToken() {
  const secretJwt = await getSecretJwt(); //from step 4

	// the access scope is what allows the permissions to flow to the token
  const token = await sdk.postGroupToken({
    grant_type: 'client_credentials',
    audience: AUDIENCE,
    client_assertion: secretJwt,
    client_assertion_type: CLIENT_ASSERTION_TYPE,
    scope: 'access'
  }).catch(err => console.error(err));

  console.log(token.data.access_token);

  return token.data.access_token;
}
Alternative Using Axios
// Assume all imports and variables from previous snippet are here
import axios from 'axios';
import qs from 'qs';

/**
* Note that Audience ensures that the returned token will be a JWT and not opaque.
* This is important because we specified that our service would not have an
* an introspection auth method. You would need to adjust the Service if you
* want to use opaque tokens to account for this. In that case, audience would not
* be required.
*
* Audience should always be a URL. This is the URL to use when requesting access
* to UE Auth. Your custom domain for UE Auth could also be used in its place.
**/
const AUDIENCE = `https://auth.unitedeffects.com/${AUTHGROUP}`

async function requestToken() {
  const secretJwt = await getSecretJwt(); //from step 4
  const options = {
    method: 'post',
    url: URL,
    headers: {
      'content-type': 'application/x-www-form-urlencoded'
    },
    data: qs.stringify({
      grant_type: 'client_credentials',
      client_assertion_type: CLIENT_ASSERTION_TYPE,
      client_assertion: secretJwt,
      audience: AUDIENCE,
      scope: 'access' // access scope ensures permissions flow to token
    })
  };
  const response = await axios(options).catch(err => console.error(err));

  console.log(response.data.access_token);

  return response.data.access_token;
}
This function will result in a JWT token which includes all necessary permissions to interact with the UE Auth API and make Create, Read, Update, and Delete REST calls for Accounts. All other API calls will return a 403 Forbidden error.
You can decode your JWT at jwt.io to see the specifics.
HAPPY INTEGRATING
Did we miss anything or is there something you think we should add that we didn't? Please reach out at [email protected].
Updated about 1 year ago