Configure Enterprise SSO by Organization
SSO for your customers
We've designed Enterprise SSO (a.k.a. Federated SSO) as an integrated part of the organization experience. There are three forms supported: OpenID Connect (OIDC), OAuth 2.0, and SAML.
SAML is currently only configurable via API
OIDC and OAuth2 can be configured right on the UI. SAML will be coming to the UI soon but in the meantime is completely configurable via a simple API call.
Click the start button, hover over Auth, and select Organizations to add SSO to one of your customers. Highlight the organization in question and in the middle column, select SSO.
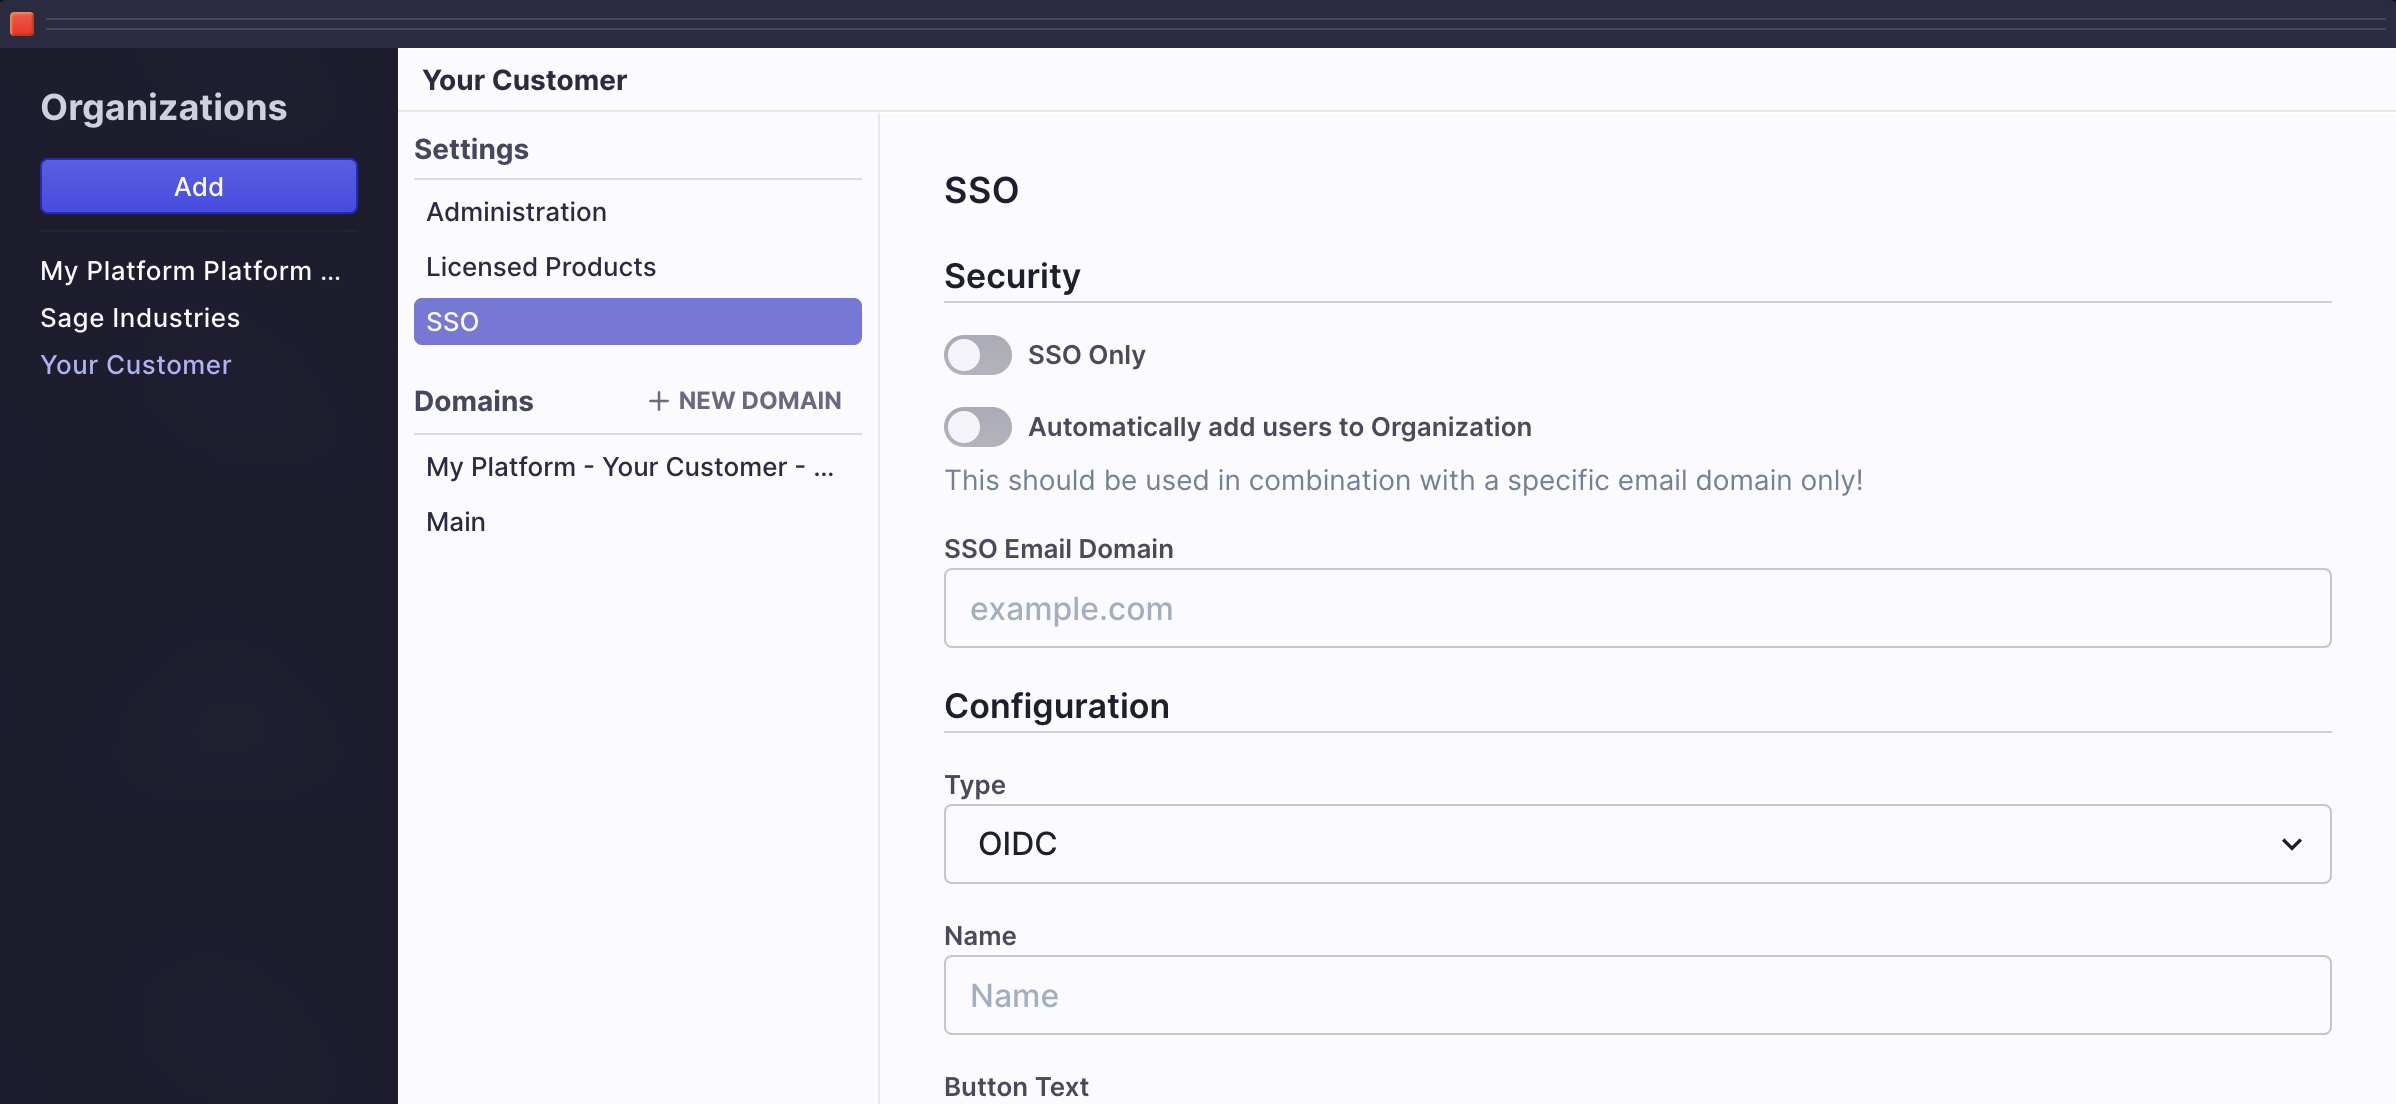
Security Options
At this top of the resulting window, you'll see a security section with two toggles and an input:
- SSO Only - This toggle tells UE Auth to disable all other alternative logins (globally configured federation, social logins, username and password, etc.) when the user is from this organization. The resulting screen places the SSO button at the top of the login screen for the user to click.
- Automatically add users to the Organization - This toggle tells UE Auth that if someone uses the configured SSO for login but they are not currently a user in UE Auth (identified by email address), they should be added as a user within the Organization. If you do not select this option, any user who was not first synced with UE Auth (or manually added) will be unable to login. WARNING: If you select this option, you may want to restrict which domains are allowed to be added. You can do that on the Administration screen.
If you allow users to be auto added to your organization, limit domains
Click "Administration" in the middle column and scroll to the bottom of the right panel. For each domain you wish to allow, type the domain and click "Add".

- SSO Email Domain - This is a unique email domain that is locked to this organization. It is used to identify a user as belonging to this organization from their email address. You can only tie one domain to the organization at this time. If that domain is currently tied to a different organization, it is unavailable. If you have also set up a Restricted Email Domain, you should type that domain here as the SSO Email Domain as well. Keep in mind that while it is possible to have more than one Restricted Domain, it is not possible to have more than one SSO Domain. For that reason, you'll want to choose the Restricted Domain that most users with SSO are most likely to have as the SSO Domain.
It is not possible to have more than one SSO Email Domain
SSO Email Domains must be unique with the platform and can only be assigned to one organization.
Once you have set up security as needed. You can begin configuration by selecting a type.
OIDC
OpenID Connect, is an industry standard authentication schema built on top of OAuth 2 most commonly associated with Google. Most enterprise workforce solutions like Google Workspace and Office 365 support OIDC. You can also use this configuration to federate to third-party OIDC identity providers such as Okta or Auth0.
OIDC and OAuth have multiple possible flows (Grant Types) that can be used. In general, we recommend Authorization Code as in the example below. This will work with most providers.

Steps for Code Authorization SSO
- Give this connection a name. In the example we simply chose "Example OIDC"
- Decide what the resulting button text on the login screen should be. This is the button the user will click. Here we have "Sign in with OIDC"
- Proof Key for Code Exchange (PKCE) is a toggle that would allow this interaction to occur without the Client Secret. For the example we have it turned off.
- Type in a placeholder for the client ID for now
- Type in a placeholder for the client secret for now
- Choose "Code" for the Response Type and "authorization_code" for the Grant Type
- The "email" scope is already added for you and required. You can add additional scopes if needed
- Add your provider's well-known discovery URI. These are typically standard for the provider. As an example,
- Google's will be: https://accounts.google.com/.well-known/openid-configuration
- Microsoft's with tenant: https://login.microsoftonline.com/{tenant}/v2.0/.well-known/openid-configuration
- Microsoft's common URL: https://login.microsoftonline.com/common/v2.0/.well-known/openid-configuration
- Contact your provider for your .well-known/openid-configuration path
- Click Submit
- At the bottom of your screen, you will now see at least one Redirect URL. If you use a custom domain, you may see two, one for each domain (UE and yours). Copy the these URLs. The structure of the URL will be:
[//]: # "Add screenshot of the redirect url here..."- https://auth.unitedeffects.com/{authgroup_id}/interaction/callback/oidc/org:{organization_id}/{connection_name}
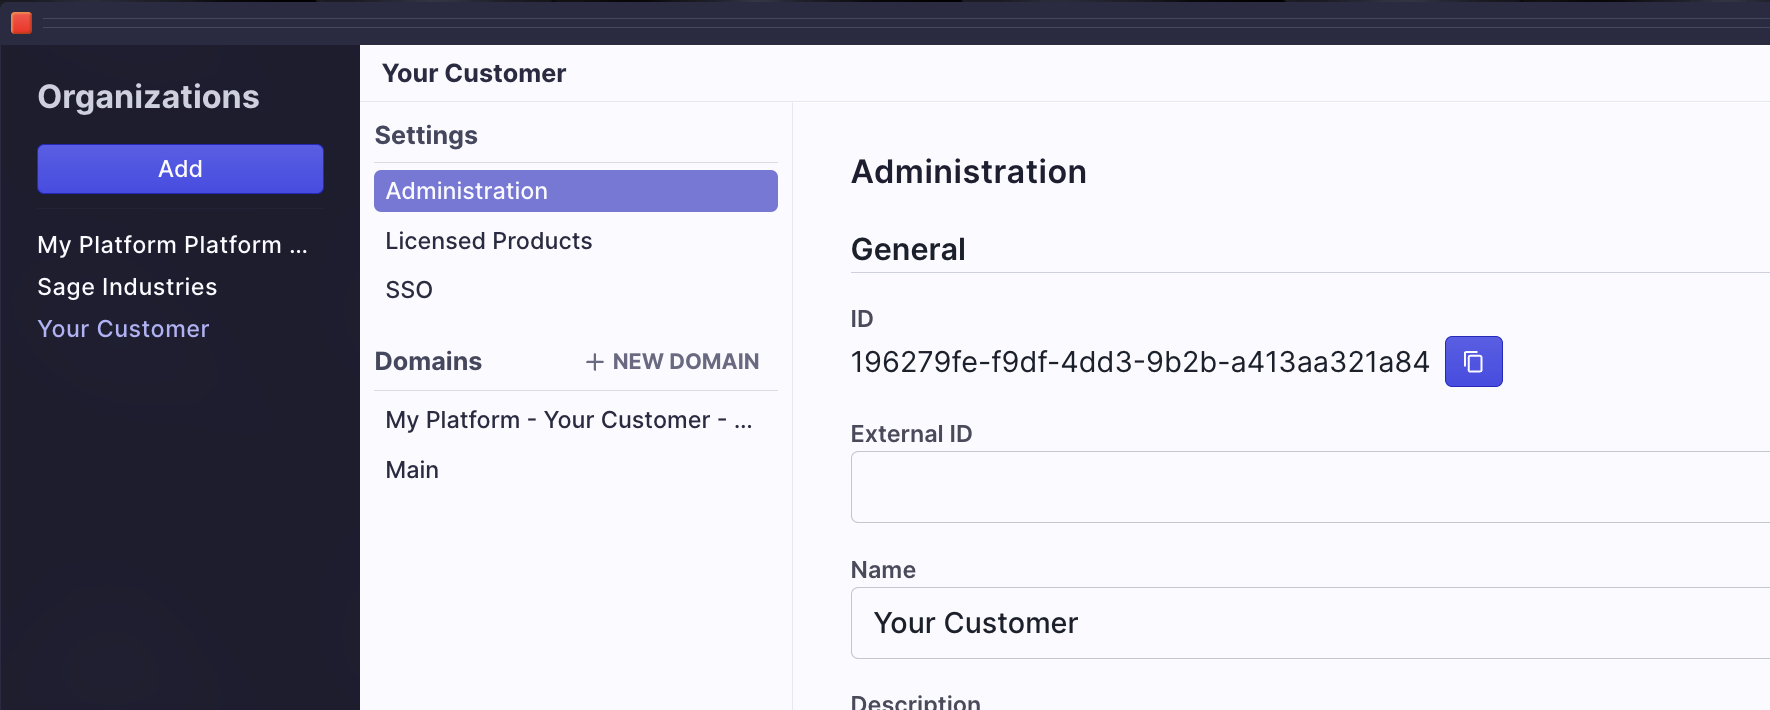
- In the above example, the redirect would be something like: https://auth.unitedeffects.com/abc123MyPlatformId/interaction/callback/oidc/org:196279fe-f9df-4dd3-9b2b-a413aa321a84/example_oidc
- Go to your provider (e.g., Google, Microsoft, etc.) and access the OIDC auth section. This will be different depending on the provider; however, you are looking for the section where you can create an oAuth client. Sometimes the provider will refer to this as an App. You will create a simple App or Client (depending on terminology used) and you will specify "authorization_code" as the supported grant type. You will also add the Redirect URLs from step 9. When you save this, you will be presented with a Client ID. You will also see the option to view or generate a Client Secret. Copy both values.
- Come back to UE Auth and update Client ID and Client Secret with the values from step 11 and click Submit.
You're all set.
There are two methods to ensure the user sees the new button on the login screen.
- Knowledge of Email Required - If you know that you want this button shown regardless of who the user is, it is possible to tell the login screen immediately on load what organization it should assume. To do so, you can append the query parameter "org=196279fe-f9df-4dd3-9b2b-a413aa321a84" to the /auth URL being used to direct the user to the login screen. The /auth URL is typically constructed by your UI client library and you can add this parameter as part of that configuration.
- Email Domain Required (more typical) - If you have entered an SSO Email Domain in the security input further up the screen, any user with that email domain will see this button. The flow in that scenario works by having the user enter their email address first. UE Auth recognizes the domain and then displays the appropriate button so they can continue with SSO.
OAuth2
Sometimes OIDC is not supported by OAuth can be used. Remember that OIDC is built on OAuth 2.0 so the configuration is similar. In the below example, we are creating federation to GitHub as the identity provider using the OAuth2 type.
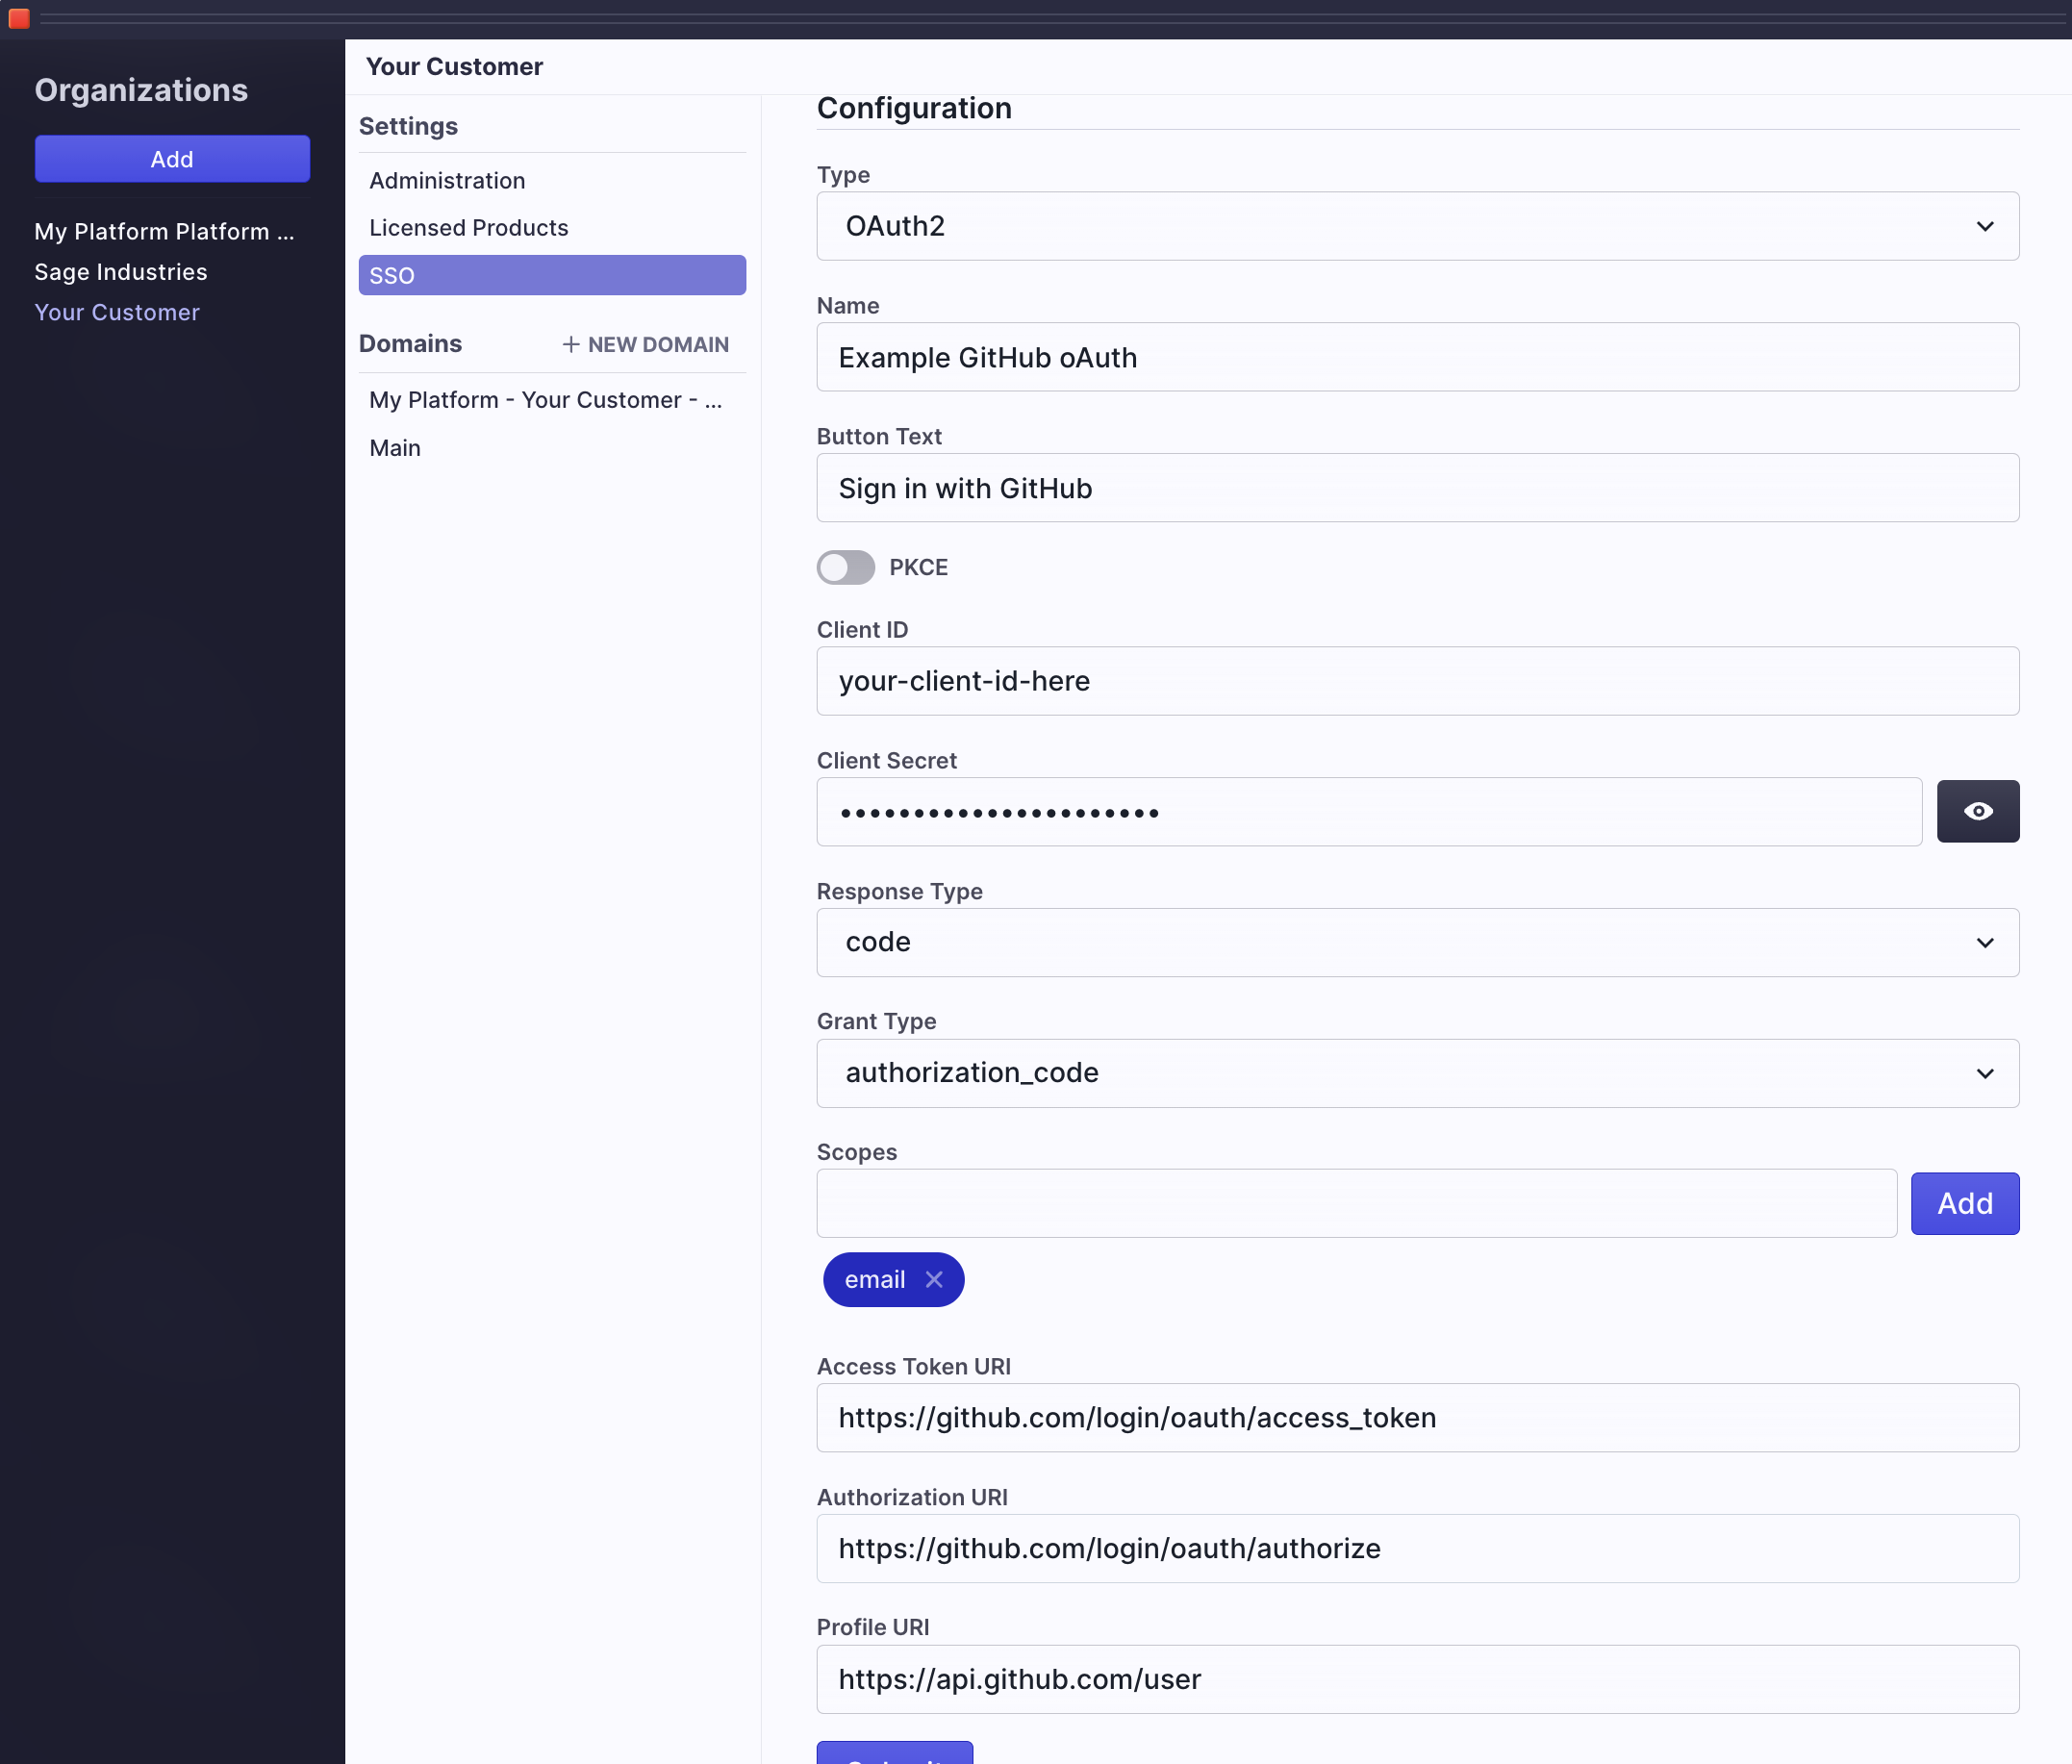
- Follow steps 1 through 7 from the OIDC approach above. You can see the example values we provided in the image.
- Your provider will have documented 3 URIs that you will need in order to make this connection: Access Token URI, Authorization URI, Profile URI. In the example, you can see what these URIs are if you are connecting to GitHub. Enter them in the fields and click Submit.
- As before, this will result in Redirect URLs being generated. Note that they will be different than the OIDC values. Copy them for the next step. Here is an example of what you might see:
- Follow steps 11 and 12 from the OIDC example above.
The same approaches for ensuring this button show on the login screen are used.
SAML
Many organizations rely on Security Assertion Markup Language (SAML) as their primary authentication schema. You will often use SAML when working with Microsoft Active Directory (AD) for example, although with Office 365 you can just use OIDC now as well. Regardless, it is an extremely common enterprise standard.
UE Auth has implemented SAML as part of our API but not in the user experience yet. This is coming very soon!
In the meantime, if you wish to implement a SAML SSO connection we are happy to help and the API is also available to you.
Let us do it for you
For us to handle this for you, we just need some information. Send the request with this information to [email protected] and we will handle the setup.
- Your email address
- Your Platform Name and AuthGroup ID (settings on the top left > Auth Group)
- The organization name and ID to which you wish to add SAML
- The text you wish to display on the SSO Button
- The following URLs from your SAML provider. See individual documentations or reach out to your provider.
- ssoLoginURL
- ssoLogoutURL (often the same as the login URL)
- idpEntityId
- Whether the request should be signed (true/false). Typically this will be true but it depends on your provider. Some IdPs do not support it. For google we recommend false. For Microsoft we'd recommend true.
- Whether we should allow unencrypted assertions. Once again, this will depend on the provider, but we typically suggest this be set to true to ensure it works. Not all providers are set up to allow encrypted assertions.
- idpCertifcates, there may be more than one. These are pem certificate contents provided by the SAML IdP.
With this information, we'll be happy to set up the request for you.
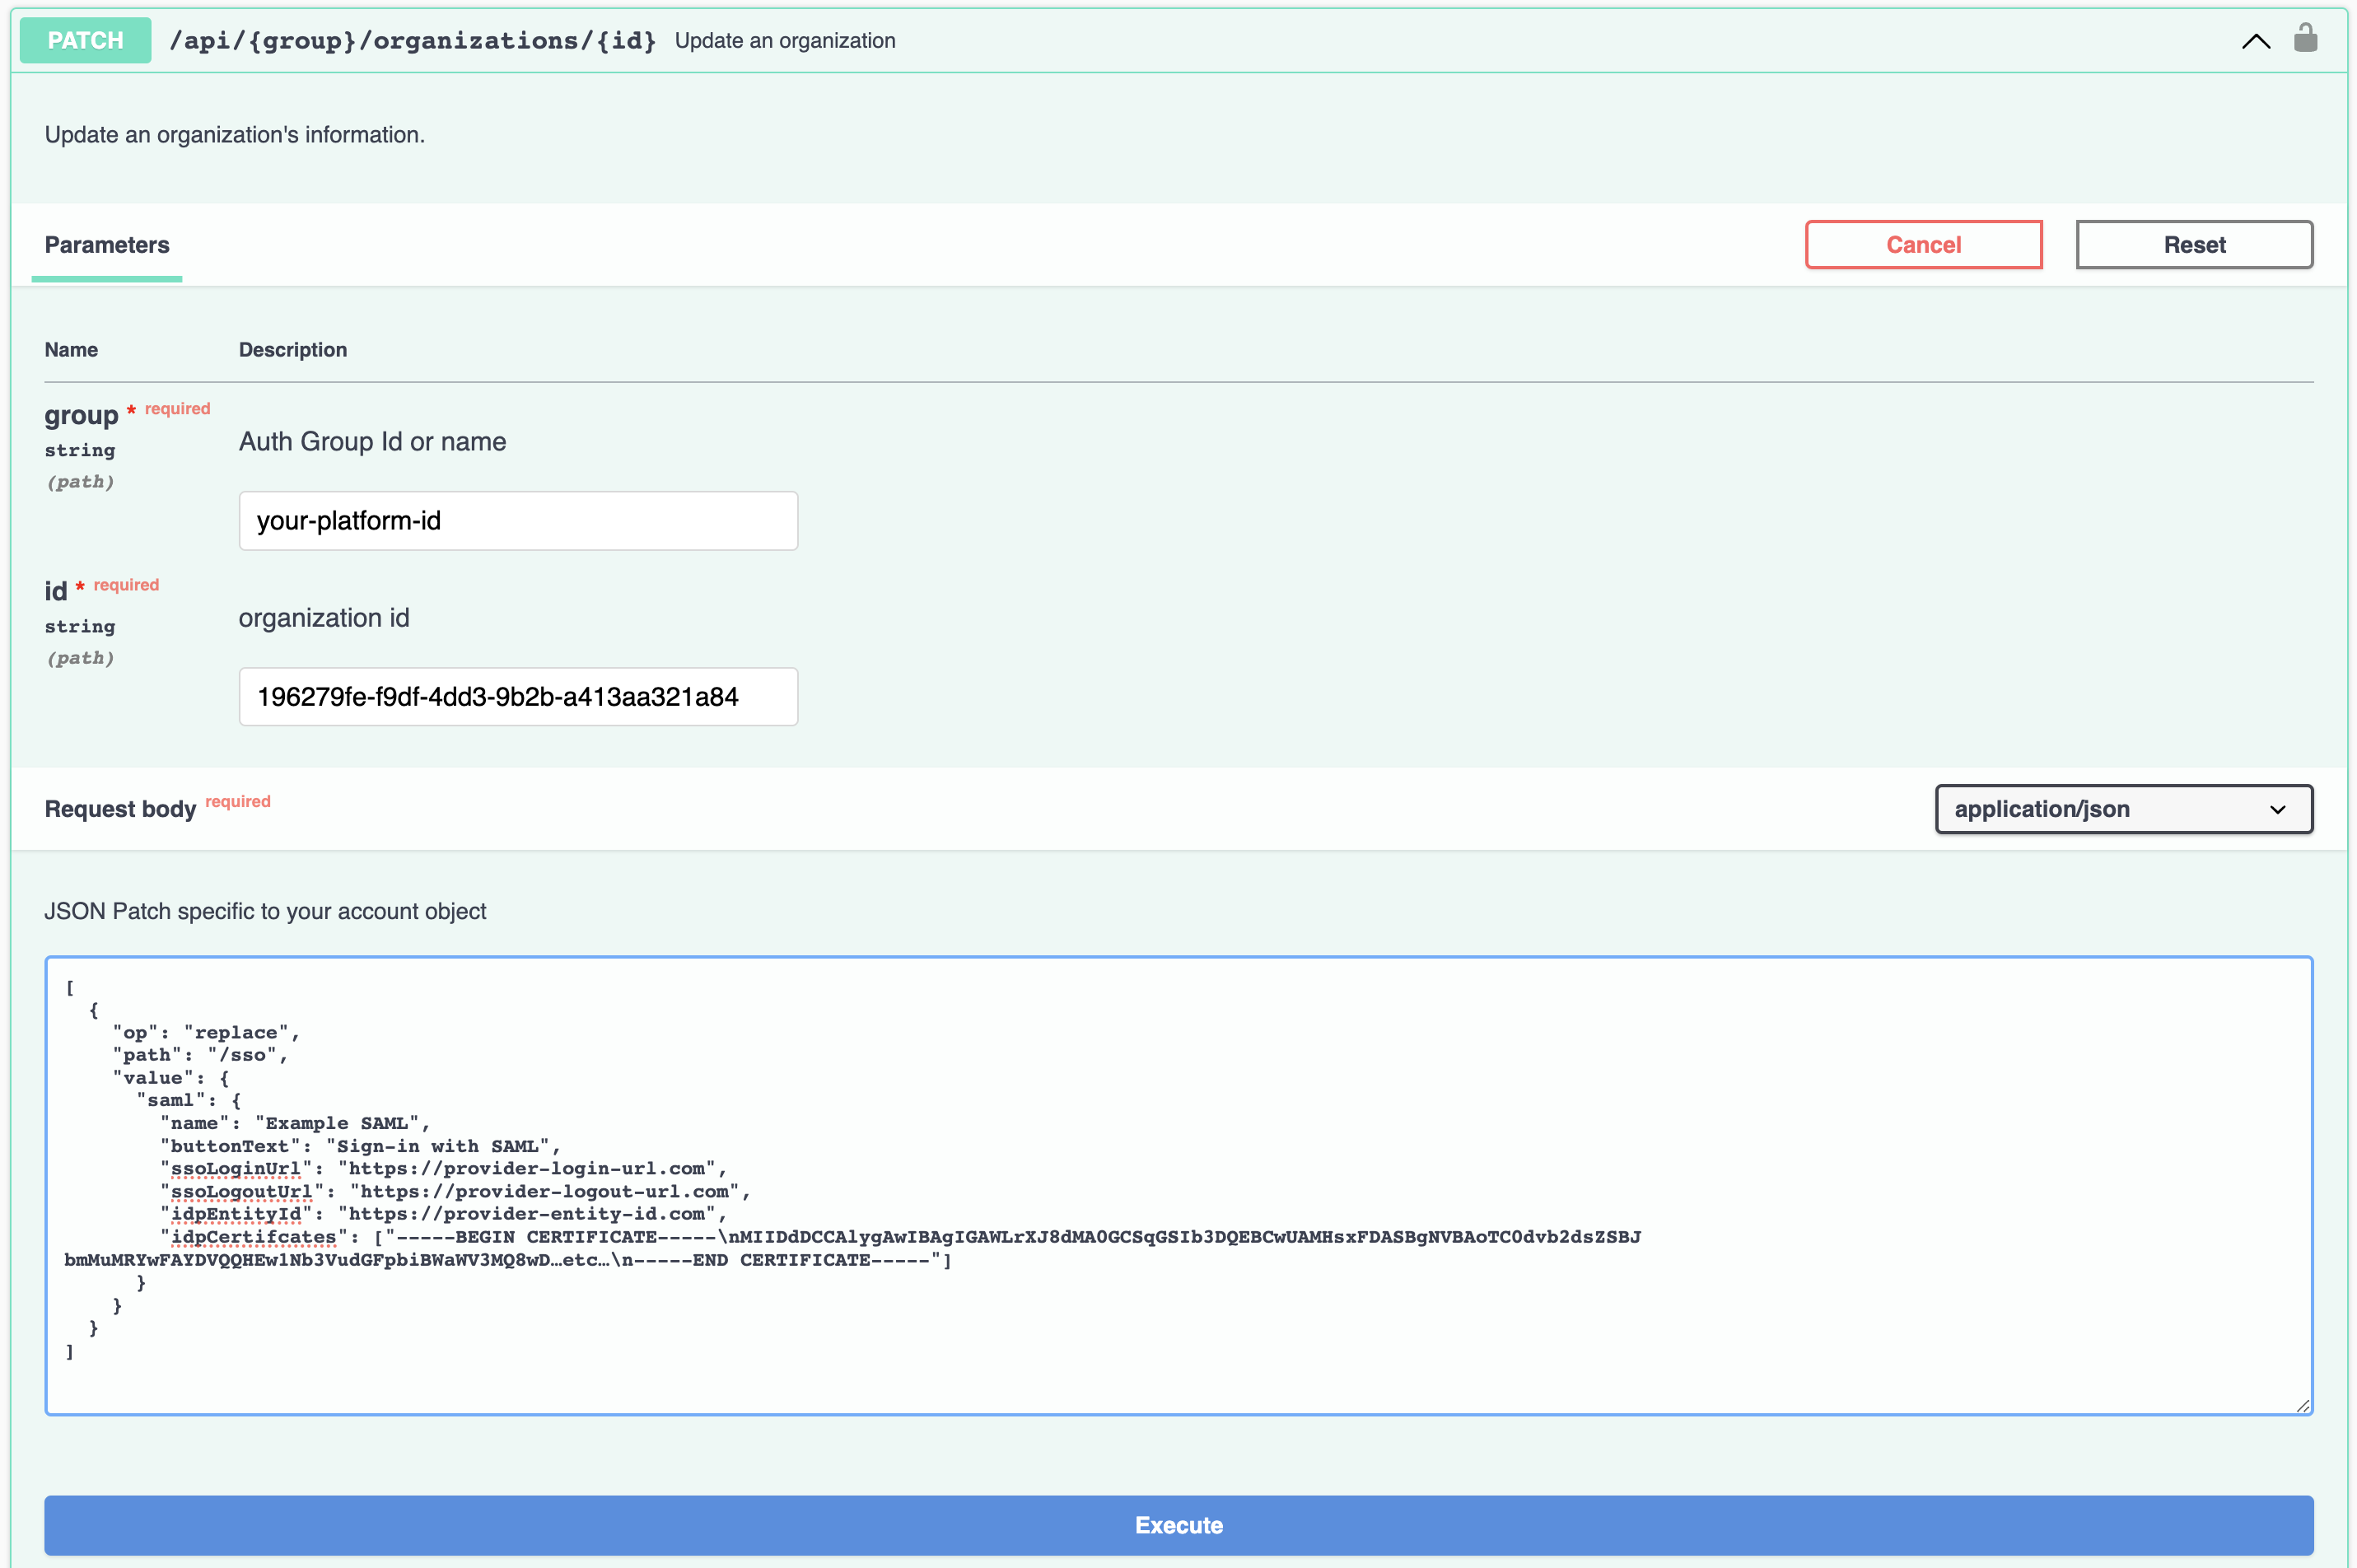
DIY with API
You can use our API to add this to the organization yourself. Organization SSO is an object on the Organization itself, so you can patch this into the data using the PATCH endpoint.
https://docs.unitedeffects.com/reference/updateorg
Here is an example request.
idpCertifcates Require Formatting for JSON
When adding the idpCertificates, make sure to escape all new lines (\n) with a double backslash (\n) before attempting to send the request.
Updated over 1 year ago