Custom Transaction Challenges
Added security for your most sensitive transactions
UE Auth has a robust set of biometric device-based verification features that enable things like MFA, Device Login, and even Transaction Challenges, which this post will discuss.
Under the hood, these features are provided and integrated to United Effects thanks to our valued partner in the zero trust space, Privakey.
So what are Transaction Challenges?
Sometimes, simply being logged in and having an access token is not enough to ensure that the action being taken is both allowed and secure. Some actions that a user may take in a system may require an added layer of security to ensure that the action is indeed allowed and that the user is authorized. When these transactions are concerning a resource within the system that is the responsibility of a person (a human who also has access to the system who "owns" the resource) it is possible to achieve this added security by simply asking permission of that person in real-time before the transaction is allowed. Here are some examples:
- John wants to view Jen's bank account information. John was given access to the account, but to be safe, a real-time request goes to Jen's mobile device to verify the access should be given. Jen can approve or deny.
- Tim wants to change the password to his online crypto account. Tim is logged in, but to be safe, a real-time request goes to Tim on his mobile device asking if he initiated this transaction. Tim can approve or deny.
- Greg wants to download a cyber security report from his company's portal. When he attempts to do so, a real-time request goes to his CTO Lauren's mobile device to authorize the action. Lauren can approve or deny.
Prerequisite
Custom Transaction Challenges are a BETA Feature
The API that exposes custom challenges is available, but live testing has been limited to a select few customers. Please test your implementation thoroughly and feel free to report any issues you may find.
For a Transaction Challenge to be sent, there are a few things that must be in place:
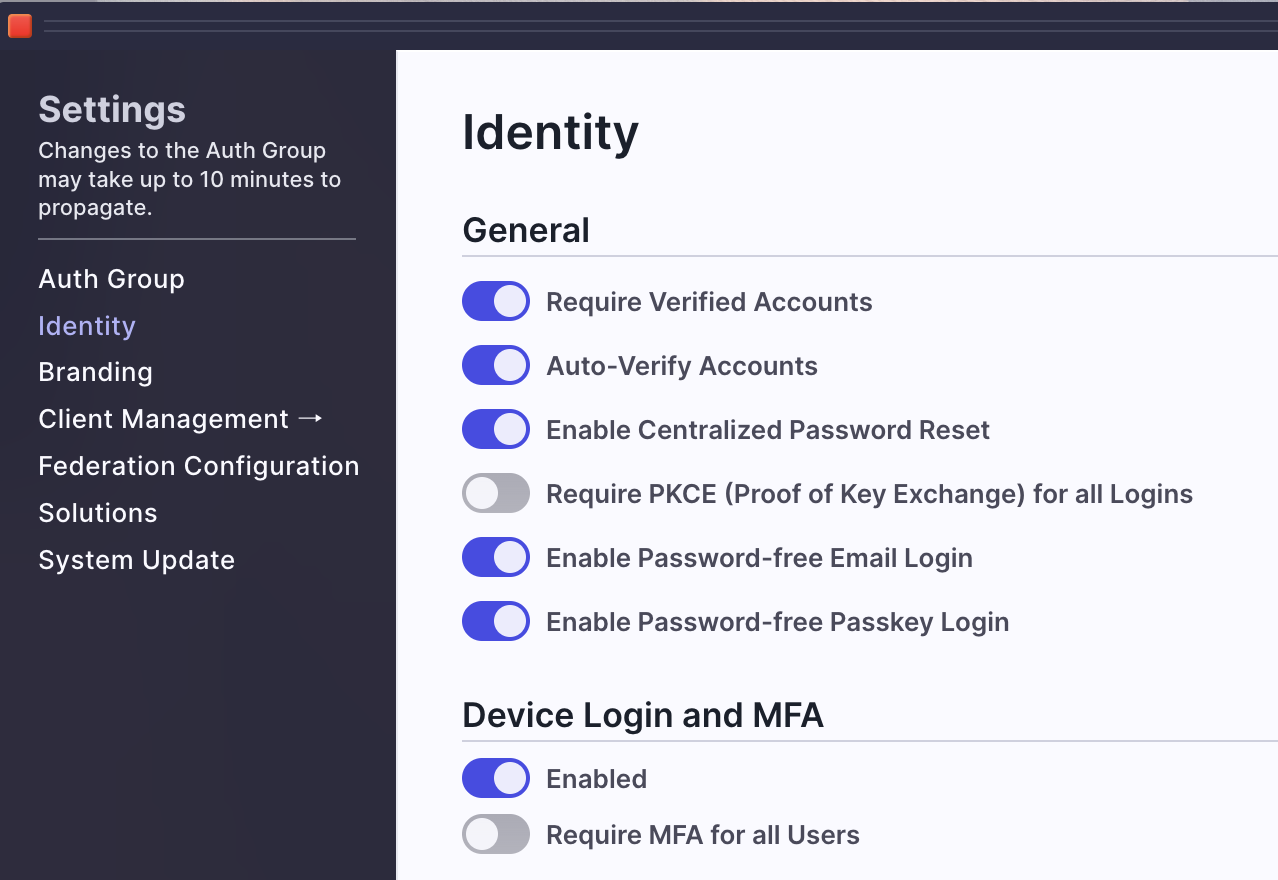
- The AuthGroup will need to have enabled "Device Login & MFA" under Settings > Identity.

- The person receiving the challenge request on their phone must enable device login and MFA for their account. You can help them do this by sending them a link for setup: "auth.unitedeffects.com/{group}/recover-mfa"
- {group} refers to your Auth Group alias or ID
- Users can also do this on their own by accessing their Account dashboard on the upper right of the UE Auth portal. Simply click "Settings" within the Account Dashboard and there is a button to enable MFA.
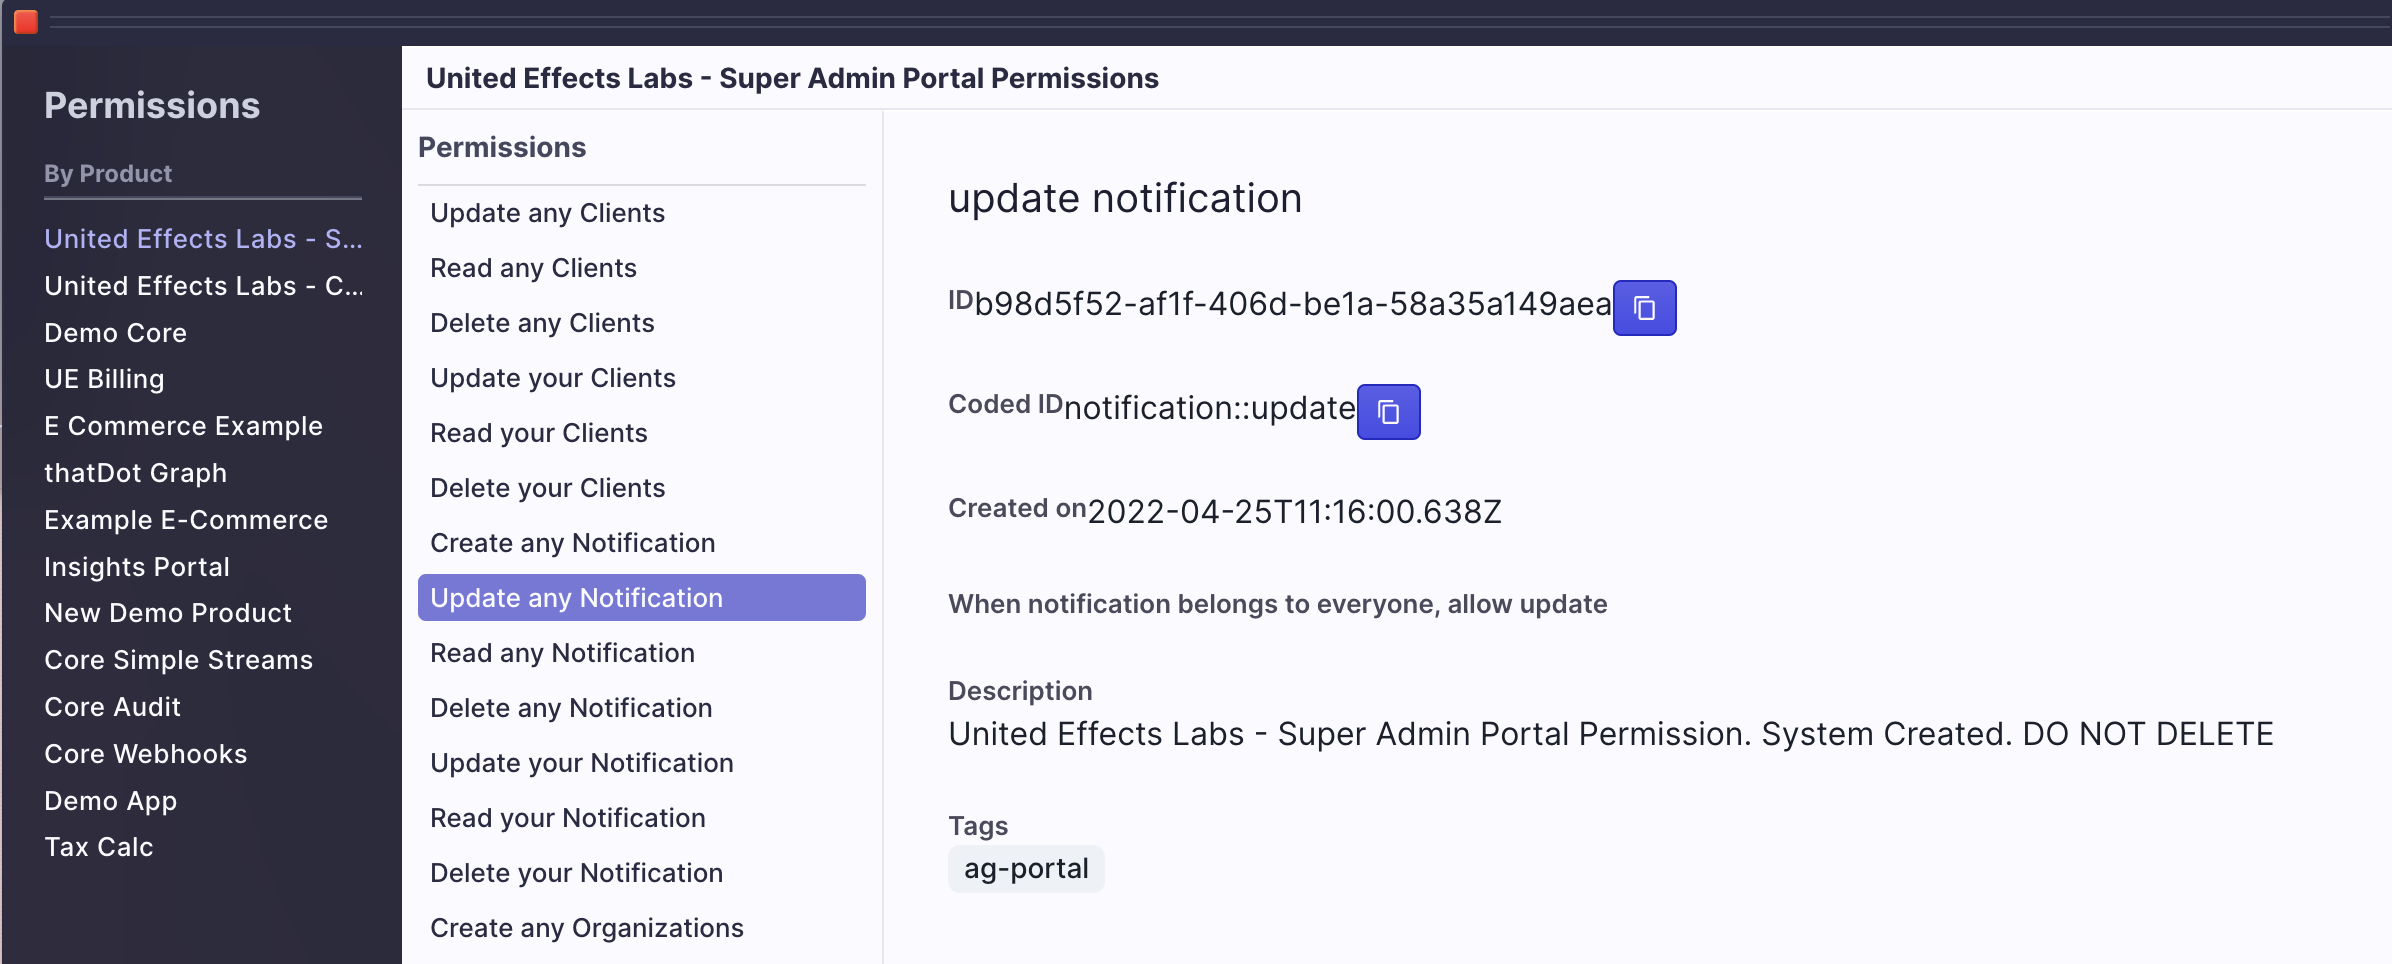
- The caller to initiate the challenge (person or machine) must be authorized to do so by having the "Update Any Notification" permission under the "Super Admin Portal" product. Example view of the permission below:

Secure Integration for the API Calls
Keep in mind that anyone who has the permission above is able to send notifications or modify existing notifications (not just transactions) to any other person in the Auth Group. It is highly advisable that only super admins within your Auth Group have this privilege. To enable the functionality for the below API calls, it is recommended that you create a Client Credential machine based automation that has this permission as Client Access. To do that, you will need to:
- Create a product to represent this or some other combination of features in UE Auth
- Create an API Service with Client Credential grant type
- Create a Role under the Super Admin Product specifically for this permission
- Add the Update Any Notification permission to that role
- Add the Super Admin Product and new Notification role to the new Product API Service as Client Access
FULL DETAILED API INTEGRATION INSTRUCTIONS
Do not skip this step, its crucial. Detailed instructions on how to accomplish the above steps can be found here: CLICK HERE - REST API INTEGRATIONS
The API
Initiate Request
Once the above is in place, the actual call to initiate the challenge is simple (VIEW IT IN OUR DOCS HERE) :
curl --request PUT \
     --url https://auth.unitedeffects.com/api/uelabs/device/challenge \
     --header 'accept: application/json' \
     --header 'authorization: Bearer B4jhD...youraccesstoken' \
     --header 'content-type: application/json' \
     --data '
{
  "title": "BETA Test",
  "header": "BETA Test",
  "message": "Approve or Deny this request when you get it.",
  "lookup": "c7dcac20-45a0-47cf-8258-e07ad55f951c",
  "callback": "https://myserver.com/process/callback/result"
}
'
In the request we are providing the following:
- title - How the request is presented on the mobile device
- header - What is displayed at the top of the request on the mobile device
- message - Details about the request being sent
- lookup - The UE Auth user ID OR email address of the recipient
- callback (optional) - The HTTP endpoint to which UE Auth should send a POST request communicating the resulting selection
Additional optional properties include:
- state (optional) - A unique cryptographically secure value to mark this transaction. If not provided, one will be generated. If unsure, we recommend letting UE Auth generate it.
- duration (optional) - How long should the system wait before the request expires? 5m (five minutes), 10m (ten minutes), etc. The default and recommended amount is 5 minutes.
Response
The above will result in the following response with 200 status code:
{
  "type": "CHALLENGE",
  "data": {
    "key": "274d84a6-3ccf-4aeb-81a5-c101c280c1d2",
    "accountId": "c7dcac20-45a0-47cf-8258-e07ad55f951c",
    "state": "1b164ffbdf3291517e5bc678850fe3e7b5fa8db0c62a785befc7d836812ebde39f9d121c2fd58204fc08b29a19af602dbd5e05aa4a286762f901f23c85d44782",
    "callback": "https://myserver.com/process/callback/result"
  }
}
You should make a note of key and state values because you will need them to verify the incoming POST request being sent to your callback URL. That request will look like the following:
{
  "accountId": "c7dcac20-45a0-47cf-8258-e07ad55f951c",
  "event": "ue.challenge.callback",
  "cb": "https://myserver.com/process/callback/result",
  "state": "1b164ffbdf3291517e5bc678850fe3e7b5fa8db0c62a785befc7d836812ebde39f9d121c2fd58204fc08b29a19af602dbd5e05aa4a286762f901f23c85d44782",
  "key": "274d84a6-3ccf-4aeb-81a5-c101c280c1d2",
  "authGroup": "your-auth-group-id",
  "response": "approved",
  "createdAt": "2023-07-30T16:29:19.254Z"
}
You will want to verify every field to ensure you are processing the right event. Notice that the authGroup value will be the ID and not the alias, regardless of with which you made the request.
Ensure an Idempotent Approach
We do not guarantee only once delivery of these events. You will want to store a record of received events for a duration of your choosing and only process those incoming events that have not been received before. In other words, you will want to make sure that your solution is idempotent and able to handle duplicate events without issue.
Polling
Remember that the callback property on the initial request is optional. An alternative approach is to simply query for the result. You can do so with the following (VIEW IT IN OUR DOCS):
curl --request GET \
     --url https://auth.unitedeffects.com/api/uelabs/mfa/274d84a6-3ccf-4aeb-81a5-c101c280c1d2/account/c7dcac20-45a0-47cf-8258-e07ad55f951c/interaction/1b164ffbdf3291517e5bc678850fe3e7b5fa8db0c62a785befc7d836812ebde39f9d121c2fd58204fc08b29a19af602dbd5e05aa4a286762f901f23c85d44782/status \
     --header 'accept: application/json'
The values of AuthGroup, Key, AccountID, and State all go into the path (see api doc linked above).
- If the user has not responded or has denied the request, the result is a status code 206 response.
- If and when accepted, the result will be status code 204.
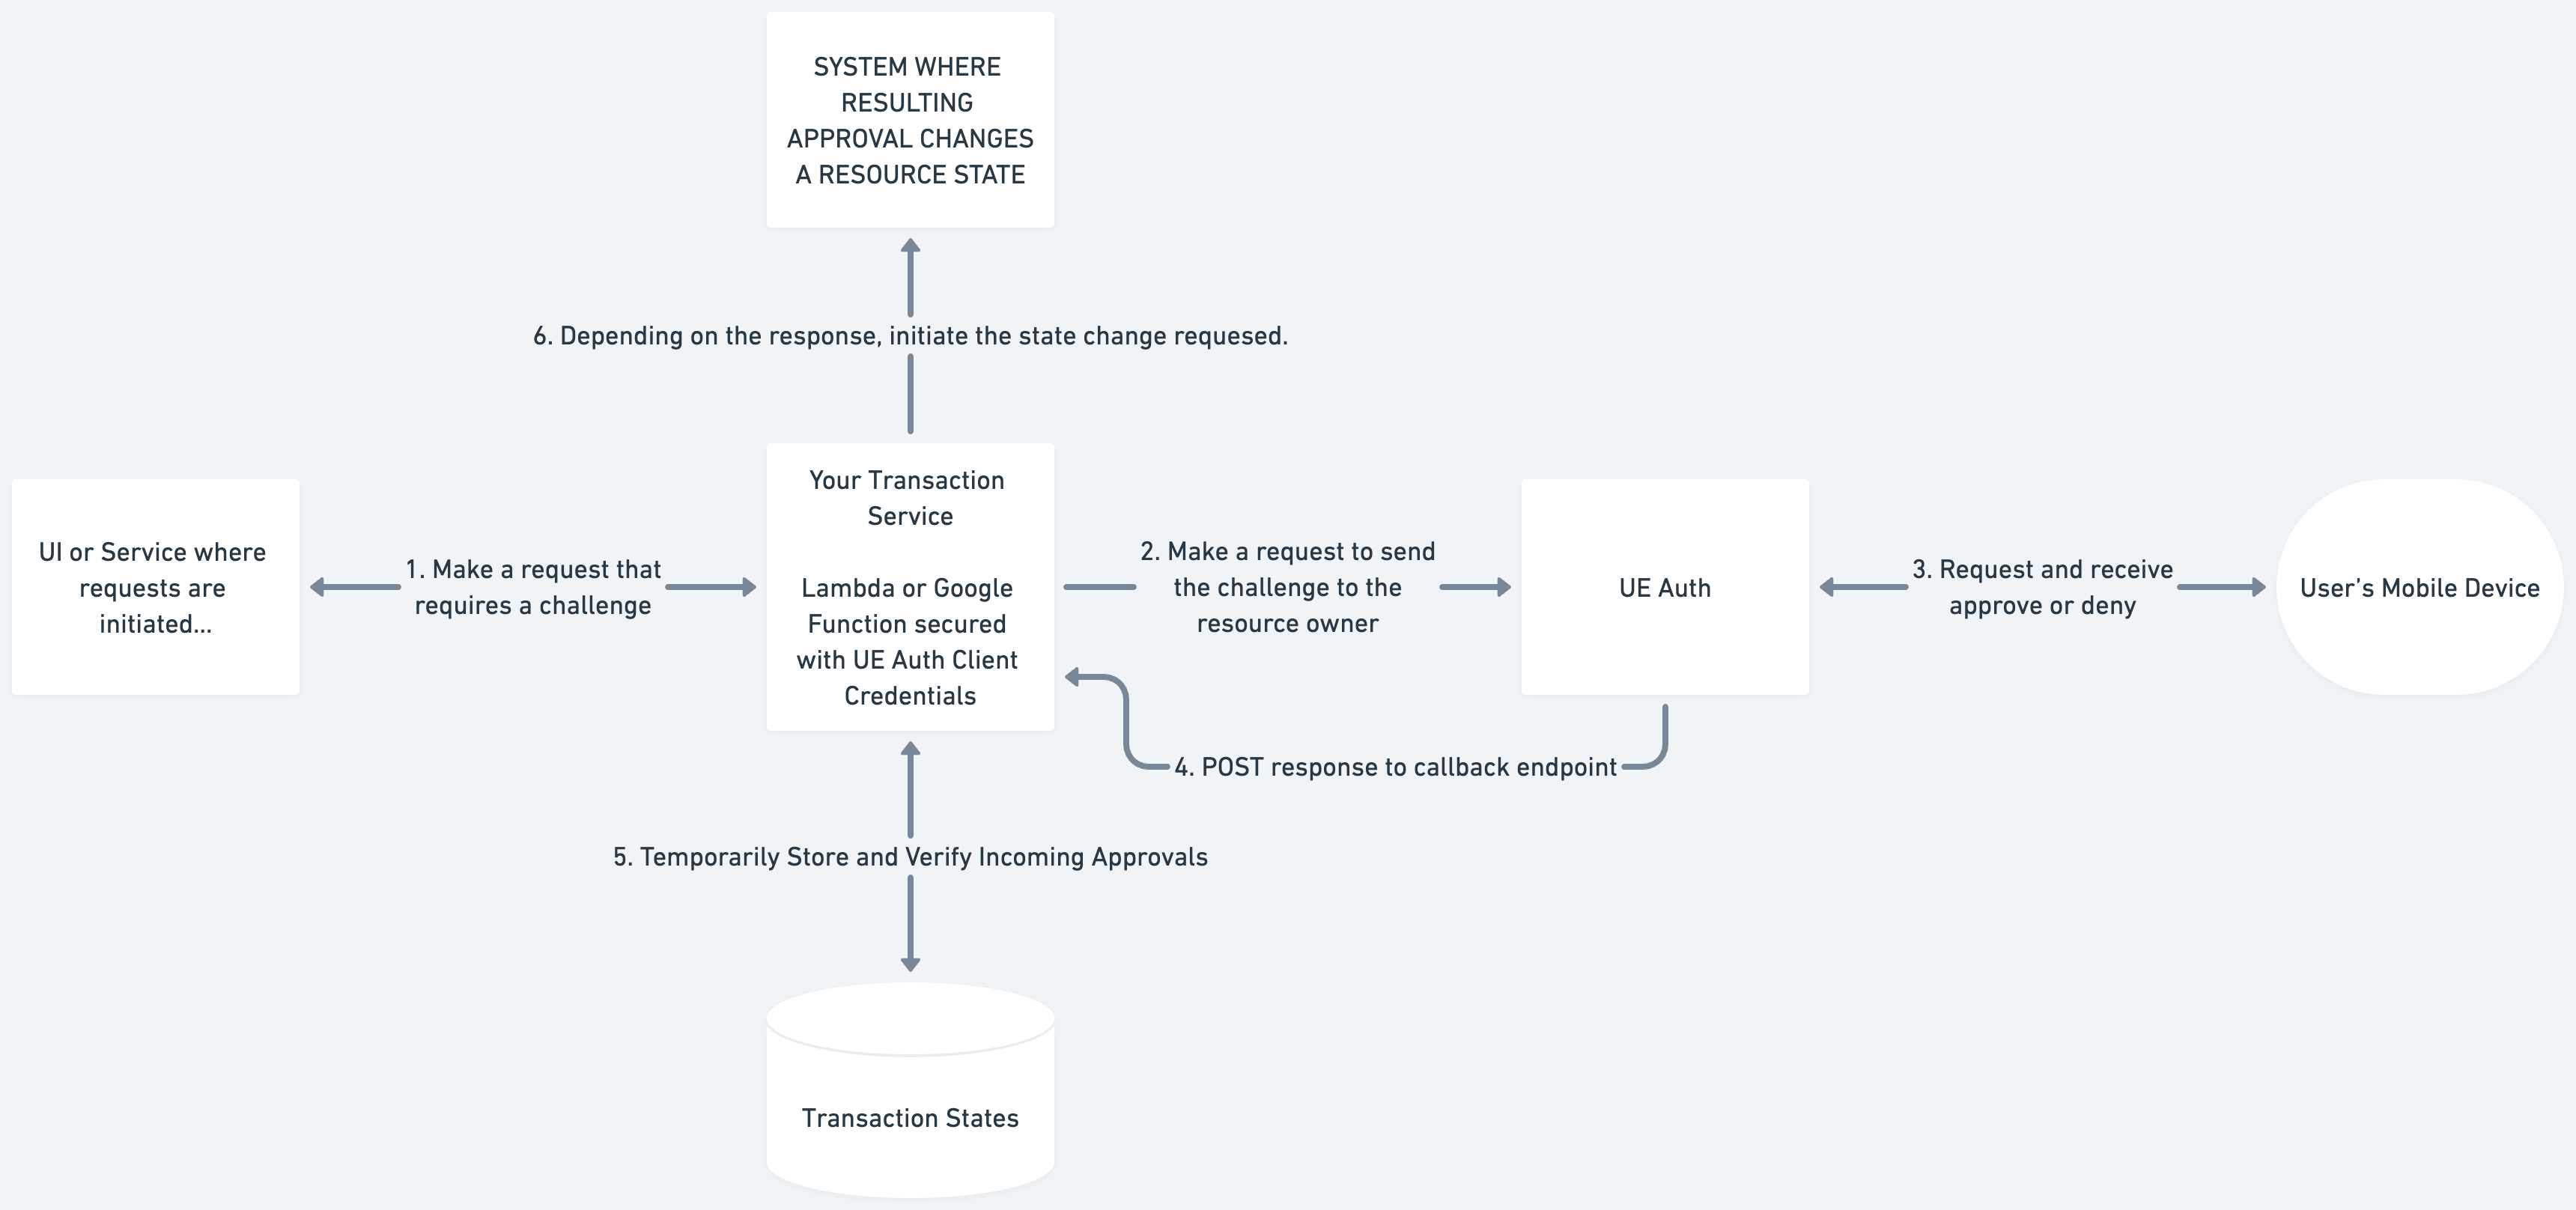
Example Architecture
There are a number of ways to implement the above functionality into your product. Here is just one approach:

Updated over 1 year ago
